LinuxのDebianをインストールして初期設定をした後は、あまりディスプレイを使わなくてもいいように、IPアドレスを固定してSSHの設定をしていきます。最初からデスクトップ環境をインストールしない方がいいのかもしれませんが、Linux初心者なのでデスクトップ環境があった方がやりやすいです。インストール時に日本語の環境構築もしてくれますし。デスクトップ環境はKDEを使っています。


もくじ
sudo権限を付与
Debianをインストールしたときに作成したユーザー(今回はdattesar)では、sudoコマンドを使えないので、gpasswdでユーザーをsudoグループに追加します。
すでに、sudo権限がある場合は必要ありません。
スーパーユーザー(root)に変更
su -
ユーザーをsudoグループに追加
gpasswd -a dattesar sudo
sudoグループに追加したら、一度ログアウトしてから、再度ログインします。
IPアドレスを固定
デスクトップ環境を使えるなら、デスクトップ環境で設定するのが一番簡単だと思います。
現在のIPを確認
ip a
このときにNIC名(ネットワークデバイス名)がわかります。
今回は、ens33でしたので、設定ファイルを編集する場合は、ens33を指定します。
設定する項目
環境に合わせて以下の値は変更してください。
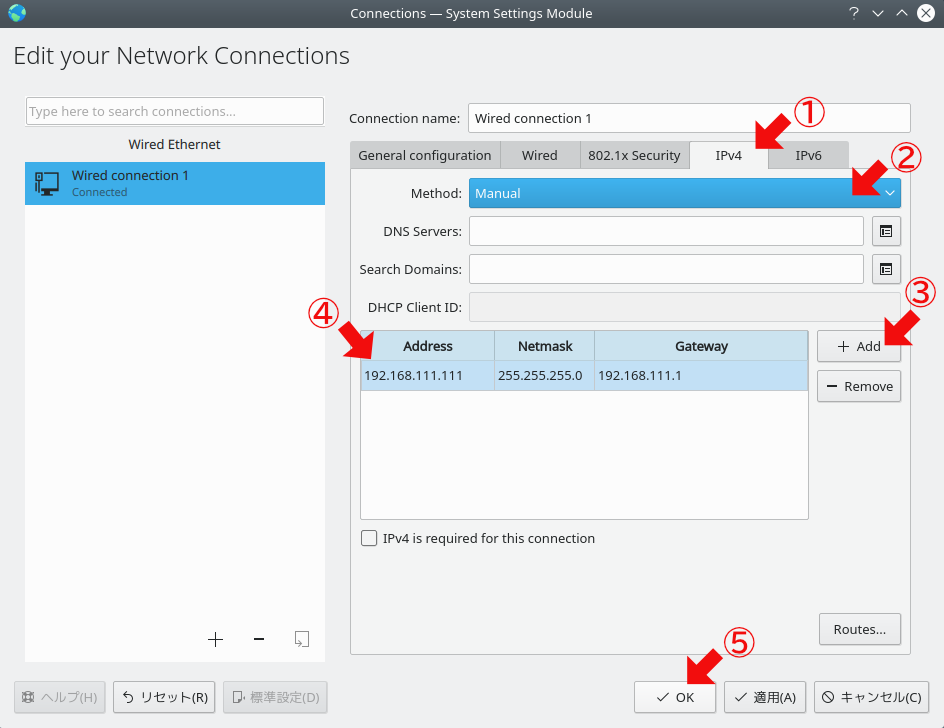
| NIC名 | ens33 |
| IPアドレス | 192.168.111.111 |
| ネットマスク | 255.255.255.0 |
| ゲートウェイ | 192.168.111.1 |
今回は、DNSサーバーは設定していません。
デスクトップ(KDE)で変更する場合
デスクトップ環境はKDEが好きなので、KDEでの設定方法を載せておきます。

再起動して設定を反映させます。
設定ファイルを編集する場合
sudo nano /etc/network/interfaces
sudo systemctl restart networking
と、入力するか再起動して設定を反映させます。
nmtuiコマンドで変更する場合
sudo nmtui
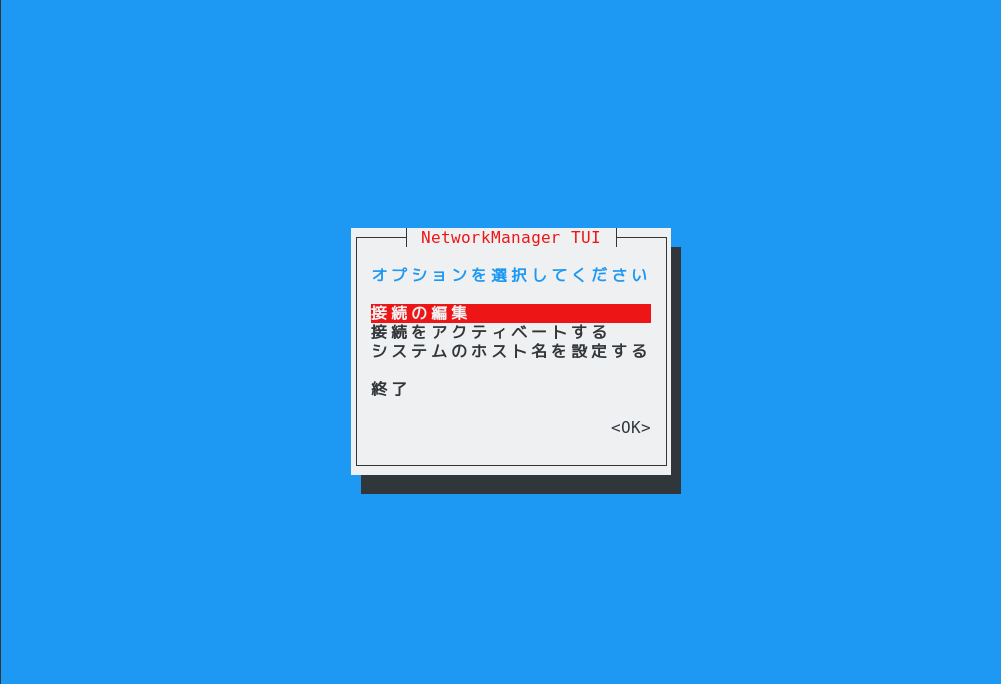
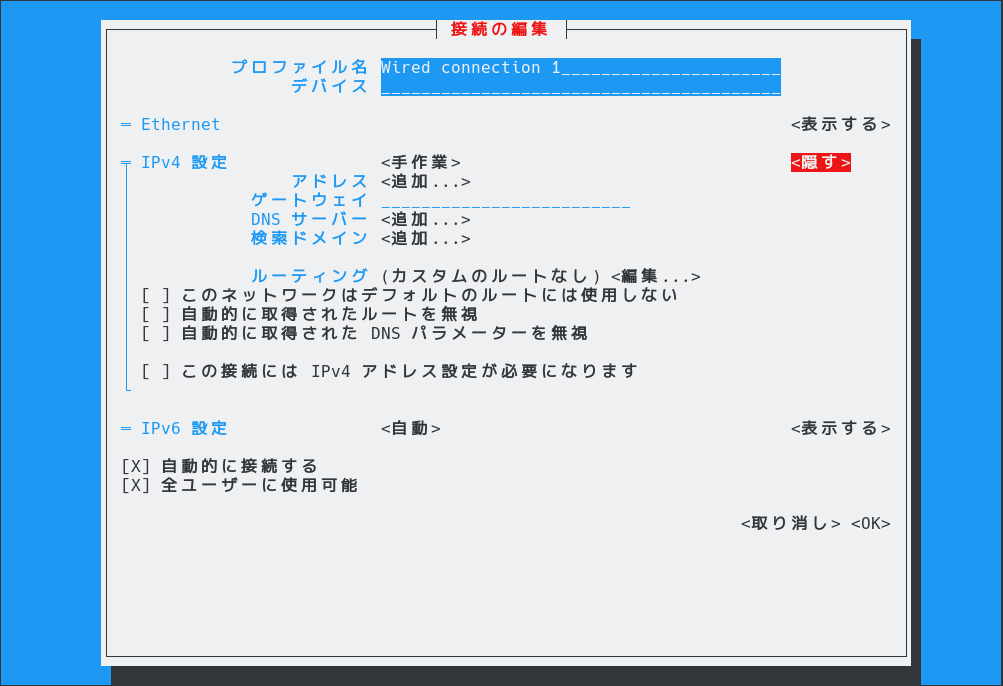
こんな感じで設定できます。
最後に、【接続をアクティベートする】を選択して、設定を反映させます。
SSHの設定
SSHをインストール
Debianのインストール時にSSHサーバーをインストールしていない場合は、SSHサーバーをインストールします。
sudo apt install ssh
SSHの設定ファイルを編集
セキュリティーを強化するために、SSHの設定ファイルを編集します。
sudo nano /etc/ssh/sshd_config
# $OpenBSD: sshd_config,v 1.103 2018/04/09 20:41:22 tj Exp $
# This is the sshd server system-wide configuration file. See
# sshd_config(5) for more information.
# This sshd was compiled with PATH=/usr/bin:/bin:/usr/sbin:/sbin
# The strategy used for options in the default sshd_config shipped with
# OpenSSH is to specify options with their default value where
# possible, but leave them commented. Uncommented options override the
# default value.
#Port 22
#AddressFamily any
#ListenAddress 0.0.0.0
#ListenAddress ::
#HostKey /etc/ssh/ssh_host_rsa_key
#HostKey /etc/ssh/ssh_host_ecdsa_key
#HostKey /etc/ssh/ssh_host_ed25519_key
# Ciphers and keying
#RekeyLimit default none
# Logging
#SyslogFacility AUTH
#LogLevel INFO
# Authentication:
#LoginGraceTime 2m
#PermitRootLogin prohibit-password
#StrictModes yes
#MaxAuthTries 6
#MaxSessions 10
#PubkeyAuthentication yes
# Expect .ssh/authorized_keys2 to be disregarded by default in future.
#AuthorizedKeysFile .ssh/authorized_keys .ssh/authorized_keys2
#AuthorizedPrincipalsFile none
#AuthorizedKeysCommand none
#AuthorizedKeysCommandUser nobody
# For this to work you will also need host keys in /etc/ssh/ssh_known_hosts
#HostbasedAuthentication no
# Change to yes if you don't trust ~/.ssh/known_hosts for
# HostbasedAuthentication
#IgnoreUserKnownHosts no
# Don't read the user's ~/.rhosts and ~/.shosts files
#IgnoreRhosts yes
# To disable tunneled clear text passwords, change to no here!
#PasswordAuthentication yes
#PermitEmptyPasswords no
# Change to yes to enable challenge-response passwords (beware issues with
# some PAM modules and threads)
ChallengeResponseAuthentication no
# Kerberos options
#KerberosAuthentication no
#KerberosOrLocalPasswd yes
#KerberosTicketCleanup yes
#KerberosGetAFSToken no
# GSSAPI options
#GSSAPIAuthentication no
#GSSAPICleanupCredentials yes
#GSSAPIStrictAcceptorCheck yes
#GSSAPIKeyExchange no
# Set this to 'yes' to enable PAM authentication, account processing,
# and session processing. If this is enabled, PAM authentication will
# be allowed through the ChallengeResponseAuthentication and
# PasswordAuthentication. Depending on your PAM configuration,
# PAM authentication via ChallengeResponseAuthentication may bypass
# the setting of "PermitRootLogin without-password".
# If you just want the PAM account and session checks to run without
# PAM authentication, then enable this but set PasswordAuthentication
# and ChallengeResponseAuthentication to 'no'.
UsePAM yes
#AllowAgentForwarding yes
#AllowTcpForwarding yes
#GatewayPorts no
X11Forwarding yes
#X11DisplayOffset 10
#X11UseLocalhost yes
#PermitTTY yes
PrintMotd no
#PrintLastLog yes
#TCPKeepAlive yes
#PermitUserEnvironment no
#Compression delayed
#ClientAliveInterval 0
#ClientAliveCountMax 3
#UseDNS no
#PidFile /var/run/sshd.pid
#MaxStartups 10:30:100
#PermitTunnel no
#ChrootDirectory none
#VersionAddendum none
# no default banner path
#Banner none
# Allow client to pass locale environment variables
AcceptEnv LANG LC_*
# override default of no subsystems
Subsystem sftp /usr/lib/openssh/sftp-server
# Example of overriding settings on a per-user basis
#Match User anoncvs
# X11Forwarding no
# AllowTcpForwarding no
# PermitTTY no
# ForceCommand cvs server
注意事項(ルール)
- #で始まる項目はデフォルト値 (コメントは#の後にスペース有)
- デフォルト値は設定行を削除しても、設定は変化しない
- 変更する場合は、デフォルト値を残しておき、変更する項目を追記する
これは、デフォルト値と追記
#Port 22
Port 1022
これは、コメント
# This is the sshd server system-wide configuration file. See
# sshd_config(5) for more information.
設定する項目
# ポート番号の変更(13行目)
port 1022
# rootでのログインを禁止(32行目)
PermitRootLogin no
# 公開鍵認証を有効化(デフォルト値)(32行目)
PubkeyAuthentication yes
# チャレンジレスポンス認証を無効化(設定済)(61行目)
ChallengeResponseAuthentication no
# PAM(Pluggable Authentication Module)認証を許可(設定済)(84行目)
UsePAM yes
変更したら、構文をチェックします。
sudo sshd -t
エラーがないなら、sshdを再起動して設定変更を有効化します。
sudo systemctl restart sshd
ufwの設定
ufwを使っている場合は、変更したポートを開放します。
sudo ufw allow 1022
sudo ufw reload
.sshディレクトリを作成
.sshディレクトリが無い場合は、公開鍵を置くために、.sshディレクトリを作成します。
.sshディレクトリを作成- パーミッションを700(drwx——)に設定
mkdir ~/.ssh
chmod 700 ~/.ssh
認証鍵を作成
クライアント側(今回は、Windows10のPower Shell)で、認証鍵(ed25519)を作成します。
RSA鍵よりも、ed25519鍵の方がセキュリティー的に強固みたいです。
ssh-keygen -t ed25519
Generating public/private ed25519 key pair.
Enter file in which to save the key (C:\Users\dattesar/.ssh/id_ed25519):
Enter passphrase (empty for no passphrase):
Enter same passphrase again:
Your identification has been saved in C:\Users\dattesar/.ssh/id_ed25519.
Your public key has been saved in C:\Users\dattesar/.ssh/id_ed25519.pub.
The key fingerprint is:
SHA256: (以下略)
認証鍵の保存先やファイル名を変更する場合は、Enter file in which to save the key (C:\Users\dattesar/.ssh/id_ed25519):
この時にファイル名を入力します。
公開鍵が、C:\Users\dattesar/.ssh/id_ed25519.pubに作成されたので、この公開鍵をサーバー側に転送します。
公開鍵をサーバー(Debian)に転送
SCPを使って、公開鍵をサーバー側に転送します。
環境に合わせて以下の値は変更してください。
| ユーザー名 | dattesar |
| サーバーのIPアドレス | 192.168.111.111 |
| ポート番号 | 1022 |
| 転送先ディレクトリ | ~/.ssh |
scp -P 1022 .\.ssh\id_ed25519.pub dattesar@192.168.111.111:~/.ssh
dattesar@192.168.111.111's password:
- -P オプションでポート番号を指定
- Power Shellでは、Windowsでのディレクトリ区切りが
/ではなく、\なので間違いやすい(タブで入力補完をすると自動で変換してくれます)
公開鍵を登録
- 公開鍵(id_ed25519.pub)を
~/.ssh/authorized_keysに追記 - パーミッションを600(-rw——-)に設定
- 必要なくなった公開鍵を削除
cat ~/.ssh/id_ed25519.pub >> ~/.ssh/authorized_keys
chmod 600 ~/.ssh/authorized_keys
rm -iv ~/.ssh/id_ed25519.pub
鍵認証でログイン
鍵認証でログイン出来るか確認します。
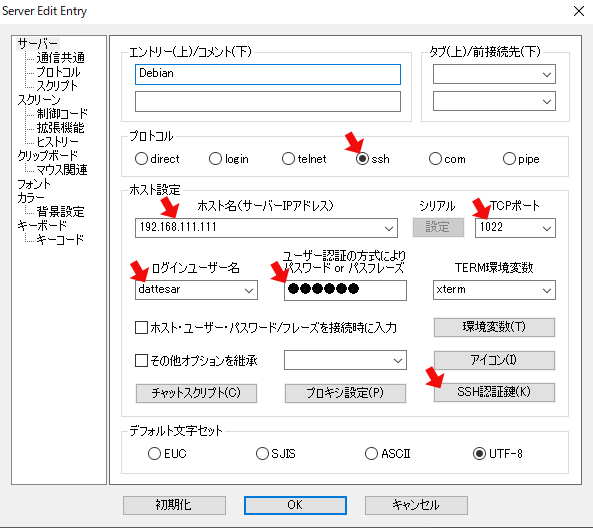
ターミナルソフトは何でもいいのですが、rloginを使っているのでrloginで説明します。
環境に合わせて以下の値は変更してください。
| プロトコル | ssh |
| ホスト名(サーバーIPアドレス) | 192.168.111.111 |
| TCPポート | 1022 |
| ログインユーザー名 | dattesar |
| パスフレーズ | 認証鍵を作成したときに設定したパスフレーズ |
| SSH認証鍵 | id_ed25519 |
SSH認証鍵は、保存場所を変更していなければ、C:\Users\ユーザー名/.ssh/id_ed25519です。
id_ed25519.pubではないので注意してください。
パスワード認証を無効化
鍵認証でログインできたら、パスワード認証を無効化します。
sudo nano /etc/ssh/sshd_config
# パスワード認証を無効化(56行目)
PasswordAuthentication no
構文をチェックして、sshdを再起動します。
sudo sshd -t
sudo systemctl restart sshd
22番ポートを閉鎖
ufwを使っている場合、接続が確認できたら22番ポートを閉鎖しておきます。
sudo ufw deny 22
sudo ufw reload


auto ens33 iface ens33 inet static address 192.168.111.111 netmask 255.255.255.0 gateway 192.168.111.1auto ens33 iface ens33 inet static address 192.168.111.111 netmask 255.255.255.0 gateway 192.168.111.1 dns-nameservers 192.168.111.1 8.8.8.8